Wednesday, May 20, 2015

Jamberry Application - You've Come a Long Way Baby

I cringe a little when I look at the first attempts I had at trying Jams on.  The wraps weren't sized well, I didn't heat them up enough, I didn't prep my nails well and as a result I got the newbie bubbles and buckles in my wraps. (I still loved the hell out of them anyhow).  It is a good thing tho to look back and see how far I've come and how much MORE I love my wraps.

A nice, clean smooth surface is always the best place to start when using Jamberry.  Use a cuticle remover and push your cuticles back really well.  The adhesive doesnt stick to skin so if you see buckles on the sides or along the cuticle - you need to do this step extra well.  Don't use wraps that are too BIG.  There should be a sliver of space in between your wrap and your skin with visible nail showing when you apply your wraps.  Going smaller will result in a wrap that lays flatter and won't bubble along the edges.
First Jam application circa June 2014
Wait till the tips cool before filing off the excess.  When you heat the wrap it becomes more flexible and you can stretch and pull it over the tip a little bit to get a smoother fit.  You want the wrap to cool so it doesnt retract any further before you file the edge off.  Then do another filing with a less gritty file (I use a glass file)  and do it at a 45 degree angle to your nail so that you are removing a TEENY bit of the wrap away from the edge of the nail.  This will expose a little bit of nail at the end so when you pick at things it is hitting the nail and not your wrap.  I will do this step for the middle, index and thumb on my dominant hand.

I will also snip a teeny triangle from the corner of the wrap at the tip of my nail for the same reason.  No one will notice but you and your wraps will last longer.

Once my wraps are all filed, I will do the extra steps of wrapping my finger tip tightly in a freezer bag and heating it up inside the bag.  This gives added pressure to the tip and the additional heat helps to seal it down.  Finally, I will take a metal cuticle pusher and heat up the curved side of the pusher with my mini heater and iron down the edges of my wraps.  This really gives my wraps quite a bit longer life and a stronger seal.

Apply them before bed so they have time to cure over night before they are immersed in water.

Watch my YouTube Application video which has most of these steps except for the Baggie method at the end

Happy Jamming!

March 2015

Thursday, March 26, 2015

Let's talk about nail damage and Jamberry

I've had a lot of customers come to me and tell me Jamberry damaged their nails.  So let's talk a bit about that and how to protect your nails.

Your nails are made of layers of keratin and are dead. They are like layers of an onion and like onion skin can get more fragile if you don't keep them hydrated and healthy.


 So right off the bat I will point out that the surface damage is cosmetic and will grow out.  

How do you avoid damage?  The adhesive on your wraps is STRONG.  This is why they can last up to 2 wks on your fingers.  GENTLE removal is essential to avoiding damage.  


NEVER EVER rip off your Jams.  Repeat after me - NEVER RIP OFF YOUR JAMS.


I apply Jamberry cuticle oil to my nail beds and cuticles daily.  I also will apply it under the Strengthening base coat.  I feel like it locks a layer of moisture in, protecting my nails, and the base coat provides the oil free layer for the adhesive to stick too.  If I am feeling particularly picky I will also put a coat of Orly Bonder on to help the Jams last even longer.

If you use your fingers to pick at things, the pressure against the wrap can pull it up and it is essentially yanking them up and can damage your nail if you aren't careful.  File your nails at a 45 degree angle so that the wrap is slightly shorter than your nail.  When you pick it will hit the nail and not the wrap, resulting in less damage.

When I remove my Jams I always warm them up by running hot water over my nails to soften the adhesive and then use my thumb to break the seal around the edge of the wrap.  Then I dunk my finger into Jamberry's new lacquer remover for 5 seconds and then slowly work the wrap off with a flosser I have coated with remover.  My Jams slide off like butter and I have zero damage.

Check you my YouTube Removal Video on how I take mine off.


Never rush removing your Jams. 

All that being said Jams aren't for everyone.  And that's ok.

Reflections on a business venture

So I have sorely neglected my blog because my life sort of exploded with my Jamberry business.  I joined in June of 2014 and now have a team of 33 ladies and promoted to Team Manager.  I am sort of flabbergasted really at now much I've earned and how I've steadily worked at growing my business and how FUN it has been succeeding.

I joined just for the product discount, because I liked the product and I knew I was going to be buying a lot of these little nail wraps. Now the income from Jamberry pays for the extras for our family and I am saving up for a vacation to Great Wolf in the fall.

I learned some important lessons along the way.  When you first start out you are SOOO excited and want to succeed SOOO bad that you risk turning people off with your fervor.  Don't be desperate let people discover that these wraps are FUN and EASY and they sell themselves.  My best piece of advice is to get out of the friend zone as fast as you possibly can.  Your business will be all the stronger for it.  Find ways to expand your networks - try a new Meetup group or take up a social hobby.  Don't be afraid to ask for business but when you do ask, don't be salesy or desperate.  

I discovered that I REALLY like helping and mentoring my team.  I get a greater sense of accomplishment from helping them promote than from my own sales.  I diligently work my business and make sure that I lead my team by example, I am always looking to learn new things to share with them and love the sense of family we have built.

I am so excited to see where the next year leads us.


Monday, November 3, 2014

REVIEW - Mally Beauty - Evercolor Shadow Stick


Get thee to an Ulta and buy this immediately.

Ok let's step back a bit and start with a regular review shall we?  I love pretty shimmery neutral shadows but I am cursed with very oily eyelids so my shadow creases at the drop of a hat - or a blink of an eye as it were.  Normally I have to wear a eye shadow primer (Urban Decay Primer potion or the Wet and Wild Fergie one works decently as well) - otherwise my shadow creeps into the creases of my lids within a couple of hours.  I got a Mally Evercolor Shadow Stick in a kit from Ulta because I wanted to try out the Poreless Defender.  Little did I know that this shadow stick was going to blow my socks right off.

I normally write off eyeshadow sticks because they never last.  Never.  Last.  Ever.    I might be able to squeeze 3 hrs out of one if I set it with a bunch of powder shadow but meh.    I got the color Saddle Shimmer in the Mally Bulletproof Essentials kit.  It is a shimmery bronze that just hints at a duochrome but doesn't really look like that on the lid.  I ignored it for many moons because I figured it was just as crappy as all the other shadow sticks I've tried.  

One busy morning I was late getting going and didn't have the time to do my normal eye makeup.  I swiped the Mally Shadow stick over my lid, blended with a finger and ran out the door.  12 hours later,  I get home and wash the warpaint off of my face and my eye shadow is not only still there - it is PERFECT.  No fading, smudging creasing or ANYTHING.  It looked like I had just applied it.

While I was picking my jaw off the ground, I decided that I need to test this shadow further.  The next day I used it as a base for my Urban Decay NAKED palette and my eye shadow stayed put ALL DAY.  No fancy primer has ever gotten that kind of performance for me, even from UD shadows which are pretty darn good quality.  I decided I needed more of these - and then got kicked in the gut - $25 a stick.  So it is pricey.  But even at this price I'd say it is worth it.  Get a color that you love that will work on its own for you as well as work as a shadow base.  My favorites are Rosy Taupe, Taupe and Dusk.  All three go really well together and under my favorite shadow palettes.

L-R: Champagne, Rosey Taupe, Taupe, Saddle Shimmer, Dusk, Gunmetal, Purple Rain
I got really lucky and found a kit on Ebay that had 5 of the shadow sticks in it for only 40$ - an amazing deal and I snapped that up so fast I nearly gave myself whip lash.  The Champagne was pretty but not as pigmented as the others and seemed to not do as well with the rub test.   Purple Rain is just incredibly beautiful, a near duochrome as well but it was more easily rubbed off than the others,  same with Gunmetal.


Rosy Taupe, Taupe, Dusk and Saddle Shimmer are nearly bullet proof once they are set.  Highly highly recommend all four of those colors, and if you had to just pick one - it would be Taupe for me.  It is just so darn pretty.

You can find these as part of kits at Ulta and on QVC - they are well worth the splurge.


Sunday, June 22, 2014

Cracked and dry heels? Get thee to Costco ASAP

Summer is coming.  No white walkers to worry about thankfully but my feet are going to be out on display quite a bit with the warmer weather.  This was posing a bit of a dilemma because my feet have been sorely neglected all fall and winter long.

I have dry, cracked, peeling just plain nasty heels.  We are talking they snag on the carpet they are so bad.  Scraggly feet we will call them.  I have tried everything.  Pumice stones, foot scrubs, salon pedicures (this gets pricey!) and the tried and true Petroleum jelly with socks on at night.  The last works ok but soon as I forget a few days, the scraggle feet come back.

It is so bad that I would curl my feet away from my husband's in bed cause I was worried my heels would scratch his feet.  Nasty.

Anyhow.  The other day I was wandering the aisles at Costco, going from sample station to sample station and stocking up on things I have little need for (26 lbs of pistachios anyone?) I stumbled upon an unassuming little foot pedicure exfoliator.

Retails for around $20 at Costco
 You can find it over by the soaps/cosmetics and hopefully the Costco near you carries it, because this my friends, is MAGIC.

Even comes with batteries included!
 You use it on dry heels, and you just rub it along the dry parts and it sloughs off the dead and dry skin.  If you have a lot there will generate a ton of dust, also known as scraggle powder.  I suggest you lay out a towel under where you will be de-scraggling your feet for easy clean up.  I was dubious at the packaging's claim that it would be a huge difference in just one use.  I purchased a Clarisonic style pedi thing before with a pumice stone attachment and that was an epic fail - so call me a skeptical customer.

After two days of use - NO SCRAGGLY FEET
I have used it for two days and never before have I gotten anything like the results above.  I'm kicking myself for not having a before photo - but trust me, my feet were perma-sock material.  Now I am looking forward to a barefoot summer and lots of footsies with my man.  You still should moisturize your feet, but this will remove that layer of dead skin and make them feel like a baby's butt.

I love this product so much I am getting one for my mom - who is the original Scraggle foot.

Wednesday, June 11, 2014

Amazing dupe for the Beauty Blender

Now for something a little different.  Foundation application can be a trixy business.  Too heavy an application can give you a masky fake look, too sparing an application can leave you splotchy looking.  The best foundation can suffer from poor application and with the right tools, a cakey looking foundation that clings to your dry spots can suddenly be transformed in an amazing real skin gorgeousness that blurs every flaw.

I've tried about every single method of applying foundation out there short of troweling it on like spackle.  That's next week.    My favorite for most liquid foundations is with a moistened Beauty Blender.  You wet the sponge, wring it out well so it's damp but not dripping, then dab it into your foundation and bounce it all over your face.  It gives the perfect amount of foundation and blends it out so well that it is UNREAL.  The only drawback to the Beauty Blender is that it's freakin' expensive.  One of these babies at Sephora is $19.99.  Twenty bucks!  And since it's a sponge, they are hard to thoroughly clean so you need to be changing them out every so often.  I'd say once every 3 months or so.  That shit adds up.

So being the cheap product whore that I am - I was on a mission to find a good dup for my holy grail Beauty Blender.  I've looked high and low, tried drugstore brands, brands from China via Ebay - you name it - they all were crap.  The imitators all had the same problem.  They were too dense.  When you wet a Beauty Blender - it expands to nearly double the size, and is easily squishable between your fingers.  These barely changed in size when wet and just did not perform anywhere as well as the original.  This made me a sad panda.

Recently I came upon the dup from Real Techniques at Ulta.  I love the brushes that come from Samantha Chapman's line and I was really excited about what she came up with in the beauty sponge space.  The Real Techniques Miracle Complexion Sponge sells for $5.99 - not much more than the drugstore version.  I had to try it out of course.


This sponge is a tear drop shape with one edge having a slanted flat edge and it tapers down to a point on the other end. The pointy side is great for blending under eye concealer and around the nose.

Wet sponge squish test
The texture of this sponge feels EXACTLY the same as the Beauty Blender and it behaves the same way when wet.  You can see how much it increases in size below.

Difference in size when wet

It applies foundation just as well and I'm amazed that such an affordable alternative is available finally after much searching.    If you love your Beauty Blender - you need to try this out.  And if you've never used a Beauty Blender - you should try this first.  Amazing!

GRADE:            A+
Performance:      A
Price:                  A
Availability:        A

Sunday, June 1, 2014

Tutorial: Applying Jamberry Nail Wraps

Here is the easiest and most fool proof method of applying Jamberry nail wraps that I've found thus far.  It is much easier than using a hair dryer in my opinion and super fast.

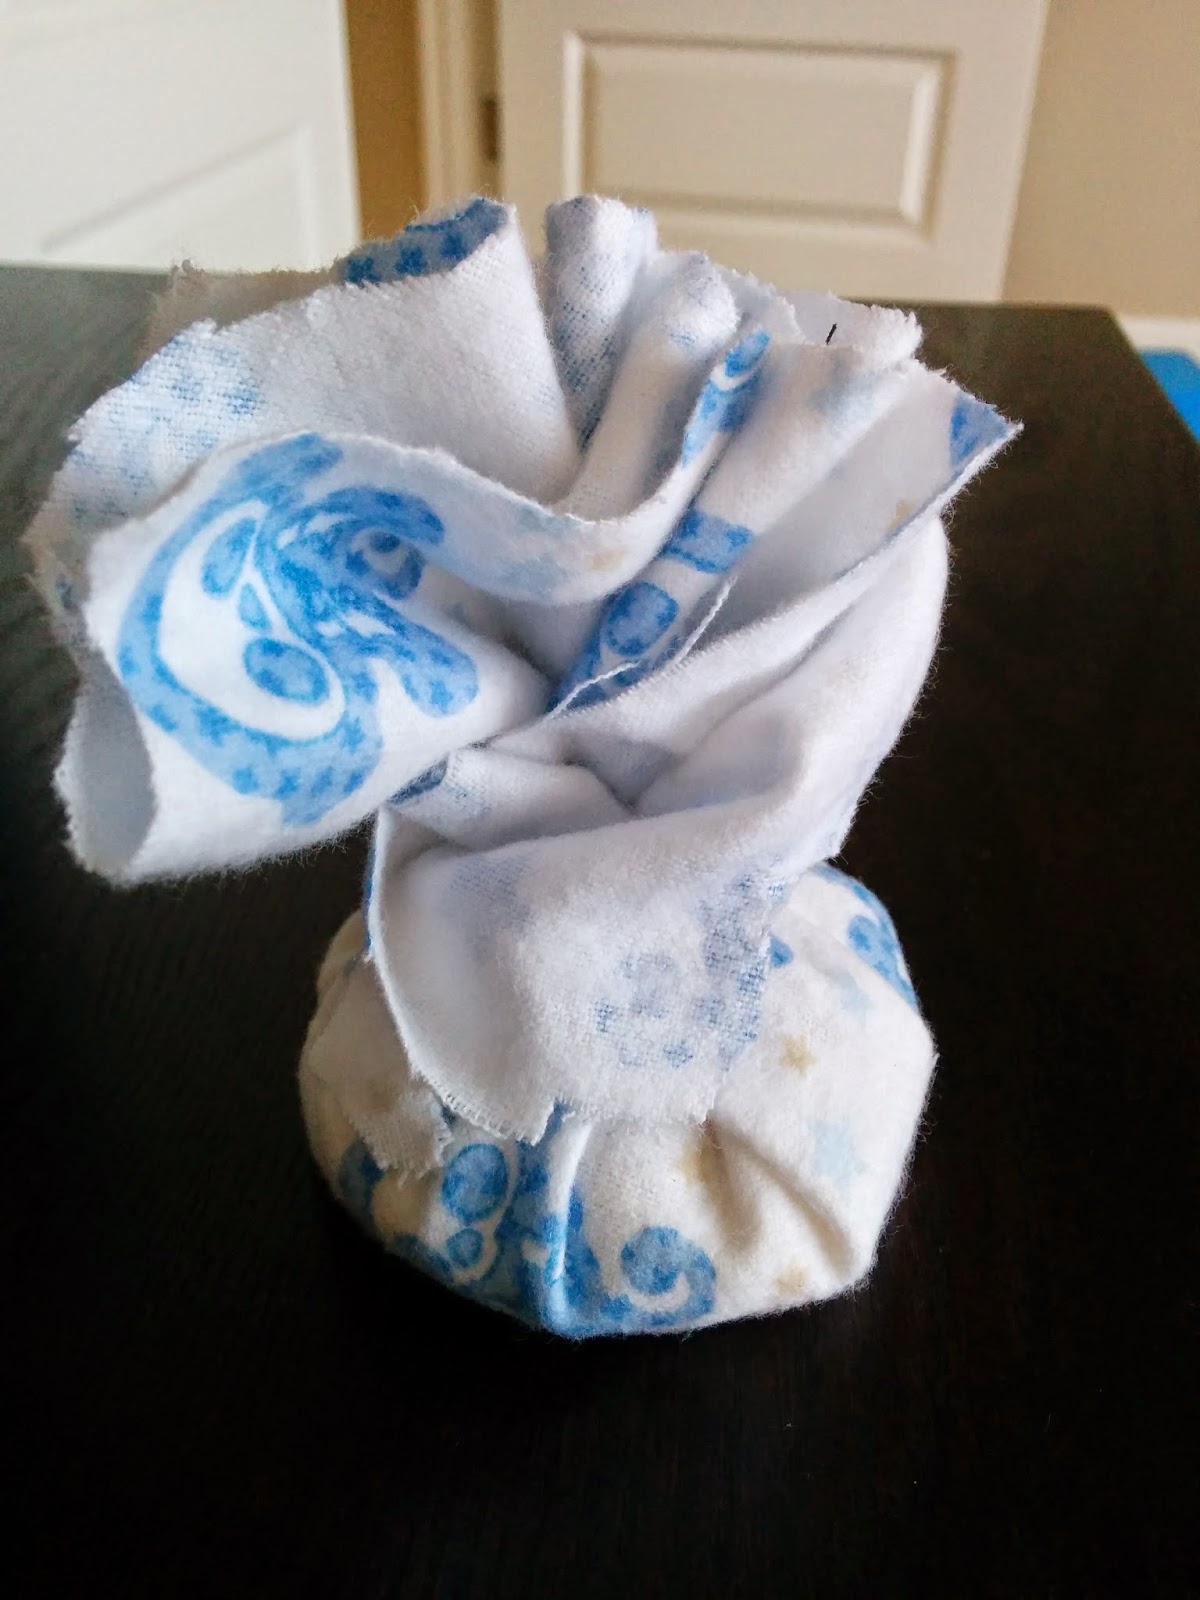
Tools:  Cuticle scissors, cuticle stick, nail file, "rice dumpling" and Jamberry wraps

You can make a "rice dumpling" by cutting a square of cotton cloth (quilting squares are cheap and easy to find at any fabric shop) filling it with uncooked rice and tying it into a bundle with a strip of your cloth.  Alternatively, put the rice in a cotton sock and tie off the top of the sock securely.  Don't use synthentic fiber socks (polyester etc) if you don't want your microwave to catch fire.


Step 1:  Prep your nails by washing and drying your hands thoroughly.  Then use a cotton dipped in Alcohol to clean your nails.  Make sure there's no residual cotton fibers on your nails from the alcohol.  (Optional: Use a cuticle remover as directed, I like Sally Hansen's)  Push your cuticles back with a cuticle stick.

DO NOT SKIP THE ALCOHOL STEP.  If you do you may have issues with the adhesive not sticking to your nail well and have bubbling along the edges and premature lifting of the wrap.


 Cut the entire sheet of wraps directly down the middle for easier application.  One half of a sheet is enough for one manicure and one pedicure.


One half of a Jamberry sheet

Cut in half again


Step 2:  Take your Jamberry sheets and lay them over your nail to figure out which fits what nail.  Unless your nails are very long, each wrap can be cut in half to save the rest for another manicure. 


Cut the wrap you are about to apply from the strip and trim it down if needed before pulling it off the sheet


Step 3:  Put the rice dumpling into the microwave for about 25 seconds.  It should be just uncomfortably hot but not burning.  

Step 4:  Lay the selected wrap onto your nail, making sure to leave a little room between the wrap and the cuticle, aligning it so its straight on your nail, and press it into place, pushing to remove what bubbles you can.  There will be some extra that hangs over the tip.

Try to keep it straight as possible and smooth out the bubbles


Wee bit of over hang that we will get rid of shortly

Step 5:  Take the hot rice dumpling and starting with dabbing motions, press and smooth it over the nail, stroking down toward the end of the nail and over the tip.  You want to use the heat to bond it to the nail, and the pressure to help get rid of any last bubbling.

Much better now that it's bonded to the nail bed


Step 6:  Using your nail file, file away the excess at the tip of your nail using up down strokes while holding the file directly perpendicular to your nail.  This is important to avoid damaging the design with the traditional sawing back and forth motion.

File up and down, and pretend I'm holding the file with my other hand instead of taking a photo

Step 7:  Use the rice dumpling one last time to smooth out any ridges and over the tip of the nail to really seal the bond.  (reheat a bit if you need to)

Voila!  

Repeat for your other nails, and that's it!